Where to print 2D barcodes on packaging


GS1 Digital Link is a standard way to encode a product identifier in a 2D barcode. It connects retail scanning with access to digital resources such as e-labels, instructions, and Digital Product Passports. For manufacturers, distributors, and brands implementing solutions tied to product transparency and EU regulations, this means positioning the symbols on the packaging correctly, so that the code works both at checkout and in consumer-facing communication.
A code can be technically correct and still cause problems at checkout or when scanned with a phone. The cause is often not its content but its position: too far from the existing EAN barcode, across a seal, on a strongly curved surface, or without the required quiet zone.
The position of a QR Code or Data Matrix carrying a GS1 Digital Link should therefore be planned as early as the packaging design stage. It should not be dropped into the first available gap at the end of the process.
The most important rule during the transition period is simple: if a traditional linear barcode and a 2D code are both intended for use at the point of sale (POS), the entire 2D symbol, including its quiet zone, should be within a maximum radius of 50 mm (1.97 in) from the center of the linear barcode.
The 5 cm rule: how should GS1 Digital Link be positioned relative to EAN-13?
During the transition period, many packages will carry two data carriers:
- the existing EAN/UPC linear barcode,
- a QR Code or Data Matrix that follows GS1 standards.
According to the GS1 guidelines for 2D barcodes at retail point of sale, the complete 2D symbol and its quiet zone should be within a 50 mm (1.97 in) radius of the center of the linear barcode. This is not simply the distance between the edges of the two symbols. The center of the EAN/UPC is the reference point, and the entire 2D code must fit inside the defined area.
It is worth correcting a common misunderstanding: the "5 cm rule" is not a minimum separation. It means exactly the opposite. 50 mm (1.97 in) is the maximum radius within which a 2D code intended for POS scanning should be placed. Positioning it closer to the linear barcode is correct, provided that both symbols retain their own quiet zones.
This rule applies to a 2D code that will be handled at checkout alongside the linear barcode. An additional consumer-only code can appear on another panel, such as the front of the package. It should have a clear label and be tested to ensure that it is not accidentally captured as a retail barcode.
The safest arrangement is to place the EAN/UPC and the POS 2D code next to each other on the same flat part of the package. If the package structure allows it, the lower-right area of the back panel is preferred. Readability, however, matters more than a specific corner: a flat surface is better than a preferred location crossed by a seal or wrapped around an edge.
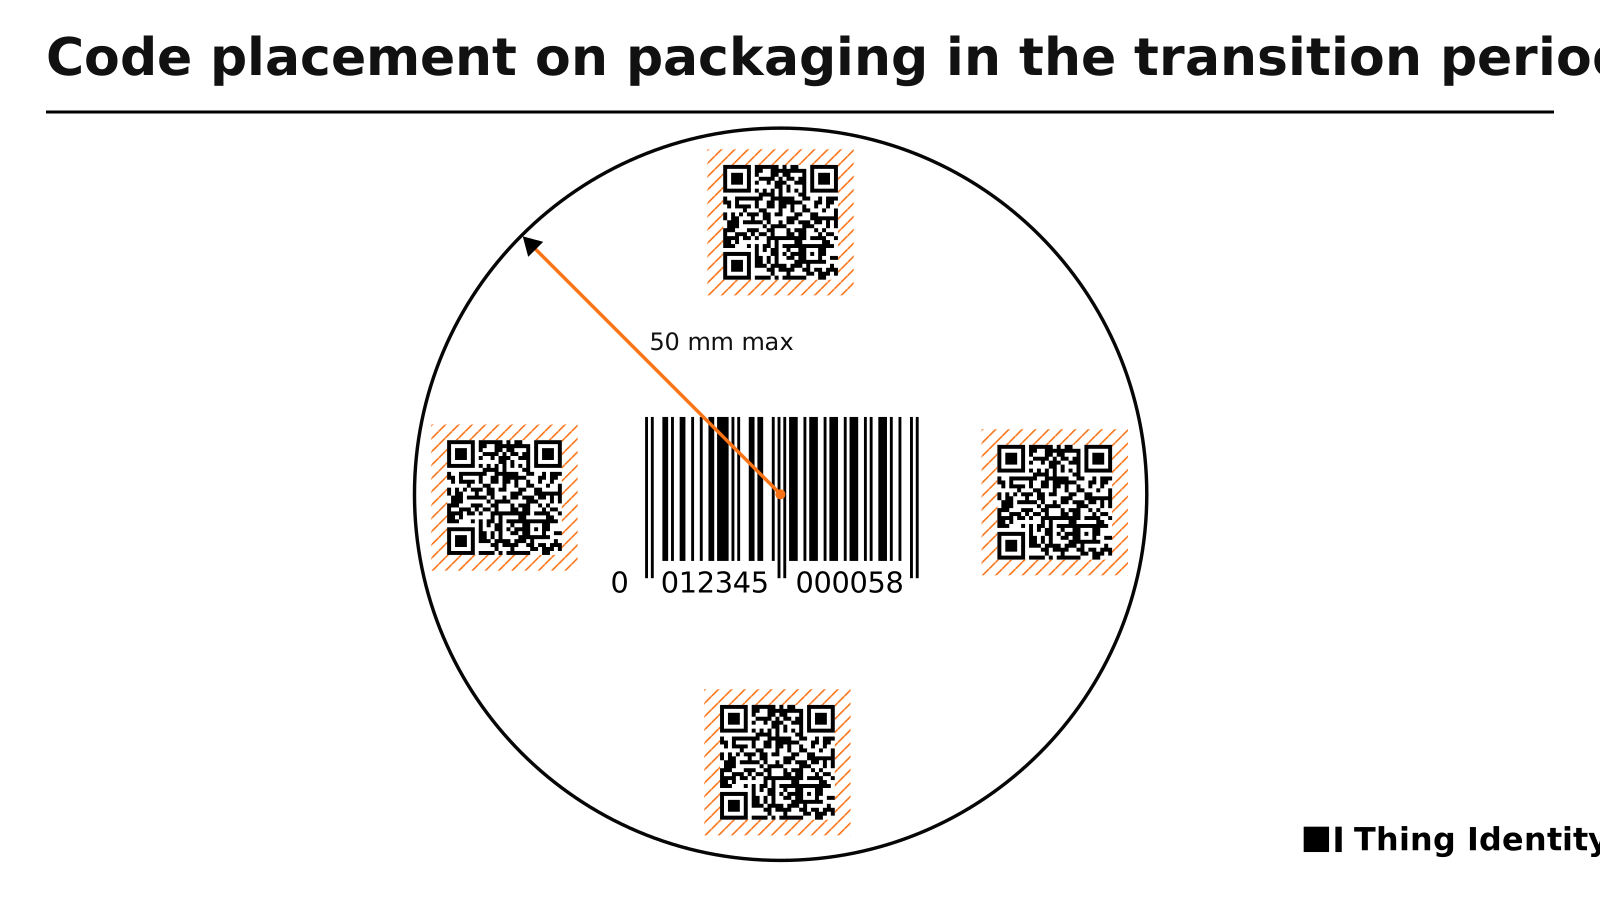
The complete 2D symbol and its quiet zone should be within a maximum radius of 50 mm (1.97 in) from the center of the linear barcode.
Quiet zones and readability: design and print requirements
A quiet zone is the clear area surrounding a barcode on all four sides. A scanner uses it to identify the boundaries of the symbol. Text, borders, illustrations, gradients, or another code entering this area can reduce readability or prevent the code from being scanned.
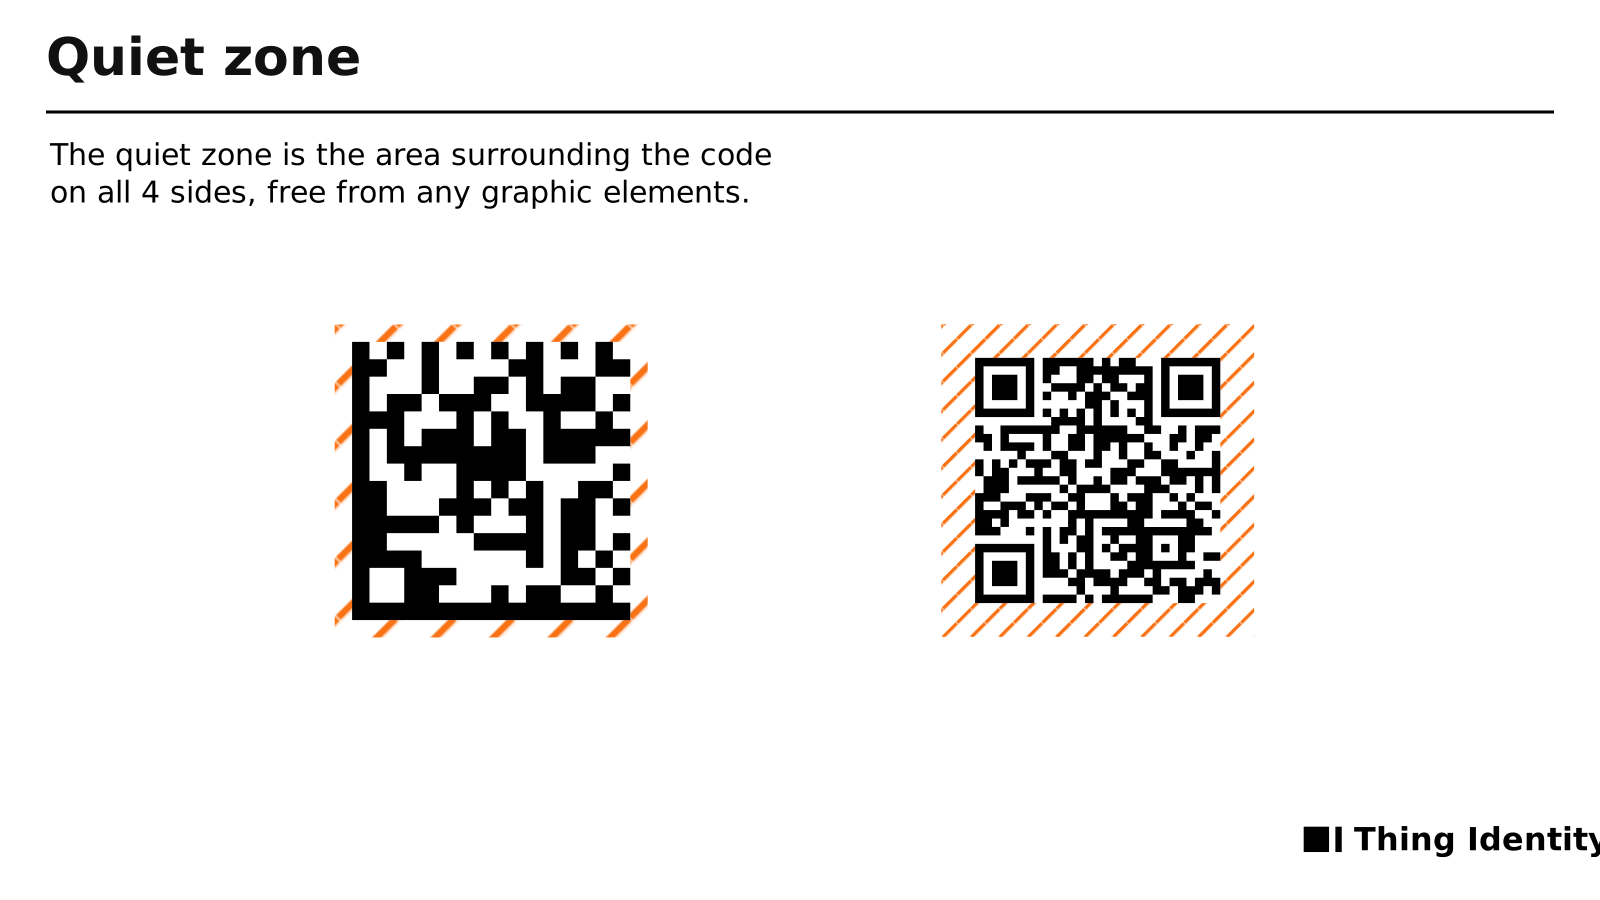
The quiet zone must remain free of text, borders, and other graphic elements.
The minimum quiet zone depends on the type of code:
- for a QR Code carrying a GS1 Digital Link, it is 4X on every side,
- for GS1 DataMatrix and Data Matrix carrying a GS1 Digital Link, it is 1X on every side.
X is the width of one module, the smallest square that makes up the code. For 2D barcodes intended for general retail, GS1 specifies the following reference values:
| X-dimension | Value |
|---|---|
| Minimum | 0.396 mm |
| Target | 0.495 mm |
| Maximum | 0.990 mm |
With the target X-dimension of 0.495 mm, the Data Matrix quiet zone is at least 0.495 mm on each side, while for a QR Code it is 1.98 mm.
Do not treat 16 or 20 mm as a universal size for the complete code. Its actual dimensions depend on the amount of encoded data, error correction level, X-dimension, and printing technology. A longer GS1 Digital Link URI or additional identifiers such as a batch number or serial number increase the number of modules and the physical size of the symbol.
The safest design uses dark modules on a light, solid background. Do not:
- reverse the contrast without professional verification,
- print dark modules over a metallic or patterned background,
- stretch the symbol vertically or horizontally,
- turn modules into decorative shapes,
- cover part of the code with a logo,
- place any element inside the quiet zone, including a call to action (CTA) such as "Scan the code" or a human-readable interpretation (HRI) of the data encoded in the symbol.
The quiet zone is part of the total space required for the code. It must also be included when checking the 50 mm (1.97 in) radius and the margin from the edge of the package.
Where should the code be placed on different types of packaging?
There is no single position that works for every product. What matters is the shape of the package, the material, the filling and sealing process, and whether the code will be read at checkout or only by a consumer.
Bottles, cans, and tubes
The EAN and the POS 2D code should be placed on the back or side label, on the flattest available area and within the required 50 mm (1.97 in) radius. Avoid the area with the strongest curvature, as part of the symbol may disappear from the scanner's field of view.
If a second code is intended only for consumer engagement, it can appear on the front or another clearly visible panel. It should carry a label explaining the purpose of scanning, such as "Check ingredients" or "View instructions".
Unit cartons
A carton makes it easier to reserve a fixed area for the symbols. The EAN/UPC and the POS 2D code can be positioned in the lower section of the back panel while maintaining the required distance, quiet zones, and margin from the edge.
A consumer code can appear on the front or side panel. This works well when it links directly to instructions, product information, or recycling guidance. Keep the code in the same designated area across language versions to reduce errors when preparing artwork for print.
Pouches and flexible packaging
Place the code on an area that remains as flat as possible after the package has been filled. Avoid top and bottom seals, folds, and areas held while opening the package. Test the code on a finished, filled pouch rather than only on a flat sheet of packaging material.
On a small package, one GS1 Digital Link leading to several types of content is often better than squeezing multiple small symbols next to each other.
Transparent and glossy packaging
Transparent material requires a uniform and sufficiently opaque underprint. Without it, the color of the product or its contents can change the contrast of the code. Gloss varnish, film, and metallic substrates can reflect the scanner's light.
Evaluate the code after every production layer has been applied, including the underprint, ink, varnish, laminate, and protective film.
Outer cases and logistics packaging
Codes on logistics packaging are used in different scanning scenarios than those on a retail consumer unit. A GS1 Digital Link can coexist with a Serial Shipping Container Code (SSCC), but each data carrier should have a clearly defined purpose and follow the applicable GS1 symbol specification table.
Do not automatically apply the 50 mm (1.97 in) retail POS rule to every logistics marking. Choose the code position for the process in which it will be scanned.
More than one code: instructions and product information
A package can carry more than one 2D code if each code has a clearly defined role and is positioned so that it does not interfere with product handling.
An example layout:
- A general-purpose or POS code appears on the back of the package next to the EAN/UPC. It identifies the product using a Global Trade Item Number (GTIN) and can lead to the main product page. GS1 Digital Link can also support product traceability across the supply chain and improve the transparency of product information.
- A consumer code appears on the front or side panel. This QR Code can link directly to instructions, preparation guidance, recycling information, reviews, or coupons.
Each code needs a clear CTA, for example:
- "Explore the product",
- "Check ingredients and allergens",
- "View instructions",
- "See how to recycle".
Do not place a consumer code in another corner of the same panel as the POS code. A checkout scanner may capture both symbols in one field of view. A separate panel and a clear label reduce the risk of confusion.
Every POS code must meet the positioning requirements relative to the linear barcode. There is no universal rule requiring several centimeters of space between every consumer code. What matters is intact quiet zones, distinct purposes, and testing on the final package.
When is one code the better option?
More codes do not always produce a better result. GS1 Digital Link and a resolver can connect one product identifier to multiple resources, including:
- the main product information page,
- instructions,
- an e-label,
- certificates,
- recycling information,
- a Digital Product Passport.
When the content relates to the same product, it is often better to print one permanent code and separate the resources digitally. A resolver can return information in the appropriate language, and the user selects the page they need.
A separate code makes sense when you need:
- a different scanning location,
- direct access to a specific function,
- a different CTA for consumers,
- a clear separation between a checkout code and a marketing or instructional code.
On a small package, symbol readability and access to essential information should take priority. Two codes that are too small are worse than one correctly printed code leading to a well-organized product page.
Digital Product Passports (DPP), e-labels, and safety information
As the number of digital information obligations grows, the code on packaging should be treated as a permanent access point rather than a one-off campaign link. It can lead to an e-label, instructions, safety information, or a Digital Product Passport.
Regulations do not change the basic printing rules. The code still needs the correct size, contrast, quiet zone, and a position suited to the scanning process. What changes is the content behind it. It is therefore worth separating the permanent product identifier from resources that may be updated in the years ahead.
One package can then support multiple languages and markets without carrying a separate code for every content version.
How does Thing Identity help after the code is printed?
Good symbol placement solves only the physical part of implementation. After scanning, a customer, trading partner, or service technician still needs to reach the correct, current information.
Thing Identity lets you:
- generate a GS1 Digital Link code in vector SVG or raster PNG format with the free GS1 2D code generator,
- connect a GTIN to product information, instructions, an e-label, or a DPP,
- publish multiple pages and language versions behind one permanent code,
- update the content served after scanning without changing the printed artwork,
- analyze scan volumes and basic visit statistics.
The platform does not replace print quality verification or testing on checkout scanners. What it does is organize the digital part of the implementation and keep products consistent as the content changes.
If you are preparing new packaging or updating an entire product line, you can book a consultation to discuss the GS1 Digital Link structure before sending the artwork to print.
Common code placement mistakes
Most problems are caused by decisions that look insignificant on the mockup:
- treating 5 cm (1.97 in) as a minimum separation instead of a maximum radius,
- placing the POS 2D code more than 50 mm (1.97 in) from the center of the linear barcode,
- allowing graphics or text to enter the quiet zone,
- cropping the code at the edge of a label,
- running the symbol across a seal or fold,
- printing on a transparent, patterned, or highly reflective surface,
- stretching the code, reversing its colors, or adding a logo without verification,
- failing to label the purpose of multiple codes,
- checking the design only on a screen without a print sample.
The code's surroundings after production also matter. An additional logistics label, outer film, or a change in seal position can compromise an otherwise correct design.
Checklist before approving packaging artwork
Before sending the design to the printer, check:
- Does the code contain a valid GTIN and correct GS1 Digital Link syntax?
- Does the POS 2D code, including its quiet zone, fit within a 50 mm (1.97 in) radius from the center of the EAN/UPC?
- Is the symbol on a flat, accessible surface?
- Is the quiet zone maintained on every side: 4X for QR Code or 1X for Data Matrix?
- Do all graphics, CTAs, and HRI text remain outside the quiet zone?
- Does the code retain sufficient contrast after varnishing and on the final material?
- Does every additional code have a clearly described purpose?
- Is the consumer code separated from the POS scanning area?
- Has a print sample been tested on a finished, filled package?
- Has the code been verified before the full print run begins?
Verify the code before the full print run
Testing with the camera on one phone is not sufficient verification. A code intended for POS use should be assessed for compliance with GS1 specifications and print quality on the final material. It is also worth testing it with the actual scanners used by your retail partners.
Local GS1 Member Organisations also offer paid barcode verification services. Their scope and pricing vary by country, so contact the appropriate GS1 Member Organisation before commissioning a verification.
Read next
- 2D codes on packaging and the new SEO: product visibility in the AI eraA practical guide for manufacturers and brands: how a 2D code with GS1 Digital Link connects a physical product with structured data that supports SEO and AI answers.
- GS1 QR Code, GS1 DataMatrix, or GS1 Digital Link: Which 2D Code Should You Choose?A practical comparison of data encoding, smartphone support, point-of-sale use, and the size of four 2D codes used in the GS1 system.
- GS1 Digital LinkGS1 Digital Link - the code that's reshaping product manufacturing.
- E-LabelE-Label - wine labelling is going digital.
- Digital Product PassportWhat is a digital product passport?